2020-05-03
2D Navmesh generation in Javascript
This post covers generation of two-dimensional navmeshes in Javascript with minimal dependencies.
Part of series about 2D navigation meshes:
What is a Navmesh?
Navmesh is a data structure primarily used for pathfinding purposes. Whereas traditional grid-based graph works perfectly well for path finding in tiled games, navmeshes make path finding efficient for arbitrary map layouts as well. This is achieved by using the underlying map geometry as the building block.
Generating a navmesh
Setup
Our starting point is a rectangular map with two objects blocking movement.
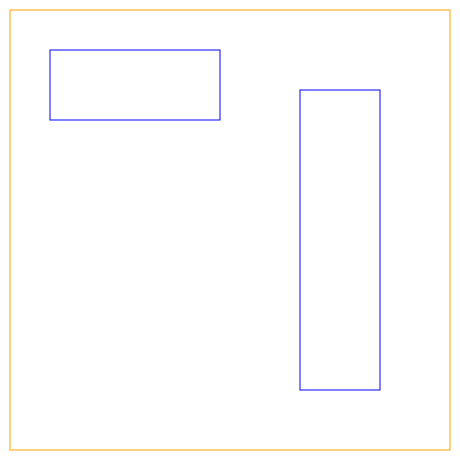
const mapBounds = {
  left: 10,
  top: 10,
  right: 450,
  bottom: 450,
};

const objectBounds = [
  {
    left: 50,
    top: 50,
    right: 220,
    bottom: 120,
  },
  {
    left: 300,
    top: 90,
    right: 380,
    bottom: 390,
  },
];
Walkable area into a mesh
Next up is the actual mesh generation. There are two options for the vertices we will have in the navmesh: triangles and polygons. Both options have pros and cons (TODO link), but here we will go with triangles since using triangles results in simpler math operations for our purposes.
This is where we benefit from libraries. I’ve chosen to use earcut.
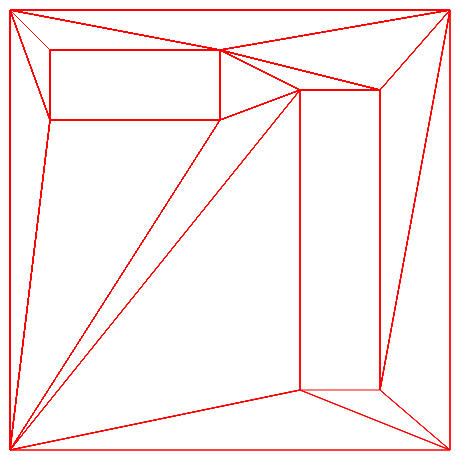
// Convert map and object bounds into polygons and concatenate into the same array
const boundariesVerts = rectPoly(mapBounds);
const objectVerts = objectBounds.flatMap((b) =>
  rectPoly(b)
);
const mapVerts = [...boundariesVerts, ...objectVerts];

// Generate indices for object vertices (ie. the polygons that will be cut as holes)
const holeIndices = new Array(objectBounds.length)
  .fill()
  .map((_, i) => (i + 1) * 4);

// Triangulate the polygon
const indices = earcut(mapVerts, holeIndices);

// End result is triangle indices pointing to our vertex data array
// Convert the indices (ie. [i]) back to vertices (ie. [x, y])
const vertices = indices.flatMap((index) => [
  mapVerts[index * 2],
  mapVerts[index * 2 + 1],
]);
Improve mesh quality
There’s still more to do. While the generated navmesh is already usable, traversing the mesh vertices would cause the actor to travel too close to the object boundaries when walking past them.
Easy way to make the meshes more natural is to add artificial margin to all our boundaries.
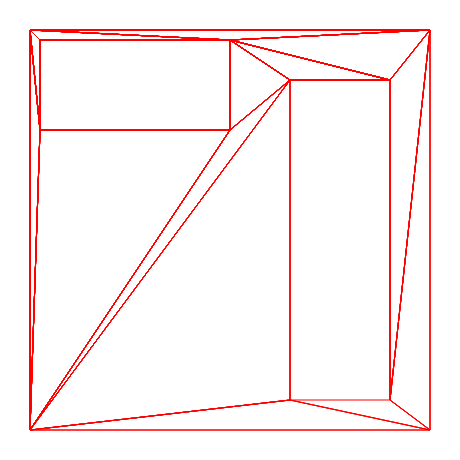
const boundariesVerts = rectPoly(
  withMargin(mapBounds, -20)
);
const objectVerts = objectBounds.flatMap((b) =>
  rectPoly(withMargin(b, 10))
);
While margin seems like it has shrunk our walkable area in this example, it will result in more natural looking paths in the end.
Appendix: utility functions used
// Generate an array of [x, y] vertices forming a polygon from the given rectangle
function rectPoly({ left, top, right, bottom }) {
  return [
    left,
    top,
    right,
    top,
    right,
    bottom,
    left,
    bottom,
  ];
}

// Return rectangle with added margin
function withMargin({ left, top, right, bottom }, amount) {
  return {
    left: left - amount,
    top: top - amount,
    right: right + amount,
    bottom: bottom + amount,
  };
}

// Draw given list of triangle vertices to a canvas
function drawTriangles(tris: number[]) {
  ctx.beginPath();
  for (let i = 0; i < tris.length; i += 2) {
    const [x, y] = [tris[i], tris[i + 1]];
    if (i % 3 == 0) {
      if (i !== 0) {
        ctx.closePath();
        ctx.stroke();
      }
      ctx.moveTo(x, y);
    } else {
      ctx.lineTo(x, y);
    }
  }
  ctx.closePath();
  ctx.stroke();
}